THANK YOU for purchasing the MINI Hot Link - Coolant Temp Adapter from CravenSpeed. This product is made from the highest grade materials, and is guaranteed to be free from defects.
You can buy our CravenSpeed Water Temp Sender Adapter for MINI Gen 3 here
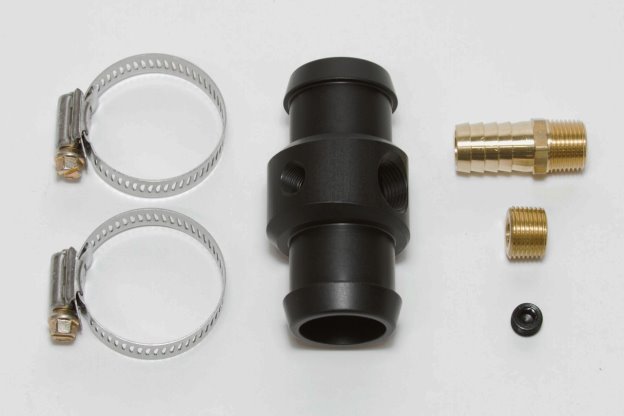
Parts Included:
- 1 ea Hot Link
- 1 ea ⅛ Pipe Plug
- 1 ea ⅜ Brass Plug
- 1 ea ⅝ Brass Hose Fitting
- 2 ea Hose Clamps
- Thread Sealant/Teflon Tape (not included)
- Coolant (not included)
- Temperature sensor or any related gauge components (not included)
Tools Required:
- 5/16 Socket Wrench or Standard Screwdriver
- 8mm Socket
- 10mm Socket
- Large Scissors or Utility Blade
- 3/16 Hex Driver
- 5/16 Hex Driver
- Drain Pan / Bucket
- Coolant hose pinch pliers (recommended)
***EXTREMELY IMPORTANT*** THE ENGINE MUST BE COLD PRIOR TO INSTALLATION OF THIS PRODUCT.
Procedure
1. Park your MINI in a level, well-lit area and pop your hood. It’s a good habit to disconnect the negative (-) battery terminal anytime you’re working around your MINI, so grab your trusty 8mm & 10mm sockets and do this now. 8mm removes the battery box cover and 10mm disconnects the (-) terminal clamp. Remove the Air Intake Duct utilizing your 10mm socket and ratchet wrench.
2. Prepare the Hot Link by applying some thread sealant/teflon tape to the threads of the ⅛ pipe plug and using a 3/16 hex driver to install it into the proper tapped Hot Link hole. Install the ⅜ brass plug with a 5/16 hex driver at this time as well. You could install the gauge temp sending unit at this time, but we’ve found that it’s easier to install the Hot Link without the wire leads from the sender getting in the way.
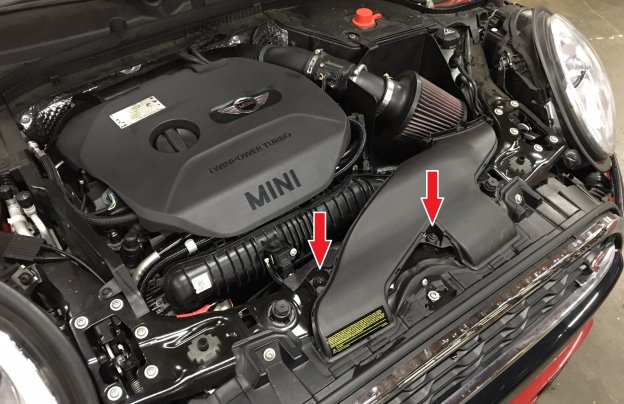
3. Locate the upper coolant hose and place your drain pan on the ground directly underneath it. If your MINI has a lower engine compartment cover installed, temporarily remove it so you don’t get errant coolant all over it.

4. Unless you have some coolant hose pinch pliers, this next step may be easier with the assistance of a helper. Pull the coolant hose away from the radiator support hose clips and observe the area of the hose that sits between the two sets of radiator support hose clips. You’ll want to make your cut centered between these sets of clips. Have your assistant at the ready to pinch the hose off close to where you’ll make your cut, while you pinch off the hose on the opposite side. Using a large pair of scissors or utility blade, cut the hose in half being mindful of where your/their fingers are. Some dish soap mixed with water can help the blade glide through the hose easier. It is normal that some coolant will drain from the cut ends of the hose.
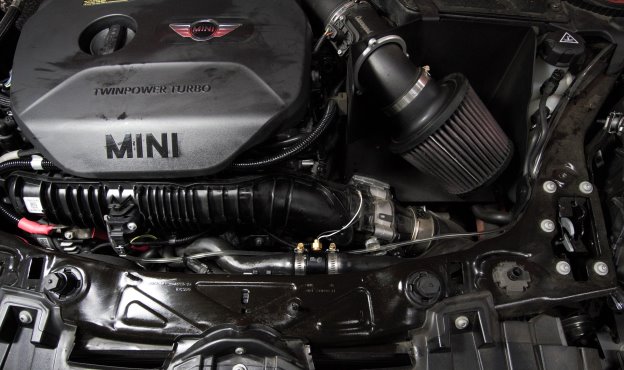
5. Slip a hose clamp over each cut end of the coolant hose and insert the Hot Link into one side, being sure to position the ⅛ Pipe Plug toward the engine. Next, push the other cut hose end onto the opposite side of the Hot Link. Make sure each side of the hose is fully seated against the center section of the Hot Link, then position the two hose clamps over the ends of the hose and tighten the clamps.
6. When you’re ready to install your gauge temp sending unit, remove the ⅛ Pipe Plug and apply thread install your choice of temperature sensor utilizing some teflon tape. Perform the necessary wiring in relation to your gauge instructions.
7. Place the coolant hose back into the radiator support hose clips and reinstall the factory Air Intake Duct.
8. If you’ve lost very much coolant over the course of this install, top it back off with what’s recommended by the factory. Reconnect your battery and you’re good to go!
Please be sure to clean up any spilled coolant that may be left on the ground as it is extremely harmful to our furry friends.