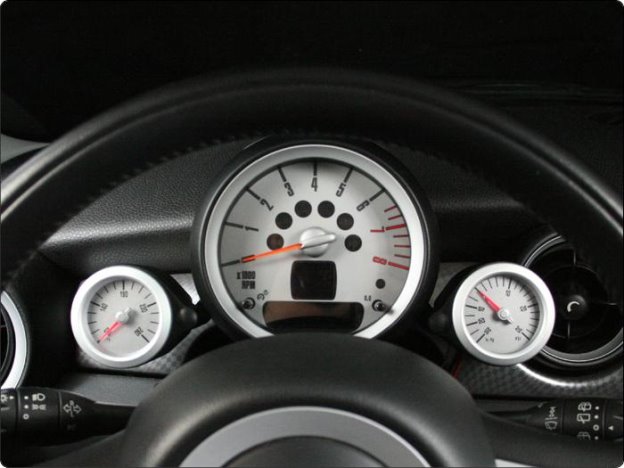
THANK YOU
for purchasing the MINI R53 Complete Gauge Pod Kit from CravenSpeed. This product is made from the highest grade materials, and is guaranteed to be free from defects.
You can buy our
CravenSpeed Complete Gauge Pod Kit for MINI Gen 1 here
Before You Start
… please read through the instructions completely. These instructions contain the information necessary to install a variety of gauges, so some of the information may or may not pertain to your specific build.
• ALWAYS WEAR SAFETY GLASSES.
• Install gauges only when engine is cool and ignition is off.
• Disconnect negative (-) battery cable before installing gauges.
• Make sure all necessary parts, tools and materials are on hand before you begin.
• Make sure mounting location does not impair visibility or interfere with your driving.
• If drilling is required, always check behind the drilling surface for any wiring or
components that could potentially be damaged.
1. Determine the routing for the Boost/Vacuum tubing and/or wiring for Oil Pressure, Water Pressure, Oil Temp or Water Temp gauge(s)
1. First you will need to locate the stock oil pressure sensor that is located underneath and slightly to the right of the oil filter. Remove the red plastic locking tab/clip from the wiring plug and disconnect the plug.
2. Utilizing a 27mm deep well socket, remove the OEM oil pressure sensor and set aside. There’s not a lot of room to perform this step, so you may need to experiment with a few different tool configurations to remove the sensor.
3. Clean any residual oil off of the OEM oil pressure sensor then apply some teflon tape or thread sealant its threads. Install OEM oil pressure sensor onto the CravenSpeed Tapless Oil Adapter and then apply some teflon tape/thread sealant to the threads of the CravenSpeed Tapless Oil Adapter.
4. Install this unit back into the oil pressure sensor port on the engine block and tighten.
5. Take the oil pressure sending unit included with your gauge (if applicable), and apply thread sealant to its threads. Install into the ⅛ NPT port on the side of the CravenSpeed Tapless Oil Adapter and tighten. If you are not installing a sending unit/sensor at this time, install the included ⅛ NPT plug.
6. Attach your wires to the oil pressure sending unit and strategically route them along existing OEM wires until you end up at the firewall plug behind the brake booster. Zip-tie the wires into place as you go so that they stay away from hot or rotating components in the engine compartment.
7. Utilize a tool such as an awl to poke a hole through the rubber firewall plug, being careful that you do not damage anything on the other side.
8. Back inside the car, the firewall entry point can be accessed by dropping the drivers side lower dash panel. Place your fingers in the gap under steering column and pull/push down. This will unsnap the lower panel along the top and it will pivot down on hinges.
9. Look up into the dash and locate where the wires are coming into the vehicle. Carefully pull the wires through, being mindful of leaving a bit of slack in the wires. It helps to have an assistant let you know when you’ve pulled enough of the wires through.
10. Proceed with the wiring installation instructions enclosed with your gauges.
1. You will need to locate a port on passenger side of the intake manifold underneath the intercooler. This can be done without removing the intercooler, but the process is much easier with it removed. Remove the screws on the intercooler clamps, and slide the boots to the side. (
NOTE:
some force is required to remove and reinstall the intercooler)
2. Pull off the rubber hose from the intake manifold and cut a short length from it (approx 3).
3. Connect one barbed end of the tee to the OEM rubber hose, one end to the short 3 piece of OEM hose and the last end to the included length of boost/vacuum line that came enclosed with your gauge.
5. Reconnect the 3 length of OEM hose back onto the intake manifold port.
6. Route the boost/vacuum line under the intercooler toward the intake system/airbox.
7. Locate the boost/vacuum sender unit included with your gauge and mount it to an acceptable point by the intake system/airbox area.
8. Trim the boost/vacuum line, attach your inline filter (if applicable) and push the line onto the barbed fitting of the boost/vacuum sender unit.
9. Attach your wires to the boost/vacuum sender unit and strategically route them along existing OEM wires until you end up at the firewall plug behind the brake booster. Zip-tie the wires into place as you go so that they stay away from hot or rotating components in the engine compartment.
10. Utilize a tool such as an awl to poke a hole through the rubber firewall plug, being careful that you do not damage anything on the other side.
11. Back inside the car, the firewall entry point can be accessed by dropping the drivers side lower dash panel. Place your fingers in the gap under steering column and pull/push down. This will unsnap the lower panel along the top and it will pivot down on hinges.
12. Look up into the dash and locate where the wires are coming into the vehicle. Carefully pull the wires through, being mindful of leaving a bit of slack in the wires. It helps to have an assistant let you know when you’ve pulled enough of the wires through.
13. Proceed with the wiring installation instructions enclosed with your gauges.

Parts Included:
Tools Required:
Procedure
Preparation for Installation of Sender(s)
Tapless Oil PSI Adapter Install
Install T-Fitting for the Boost/Vacuum Line