Platypus Parts

Backplate
Auxiliary Parts
There are a few parts that are included only when necessary to address issues with interference of the bumper skin or parking/radar sensors on the front of the vehicle
Extension Arm - allows for further adjustment of the positioning of the backplate, used only when absolutely necessary.
The extension arm is installed between the back plate and the hex stud. To use, loosely install the arm and backplate, then find a suitable position for the assembly. Note that the arm does not have a 360 degree range of motion due to interference with the backplate.
Blinders - If avoidance of detection by the parking sensors by adjusting the position of the backplate is impossible, we use blinders to effectively disable a specific sensor.
How Platypus Works
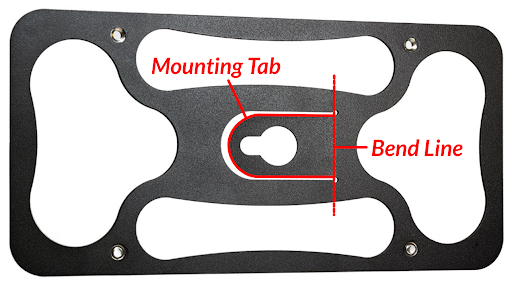
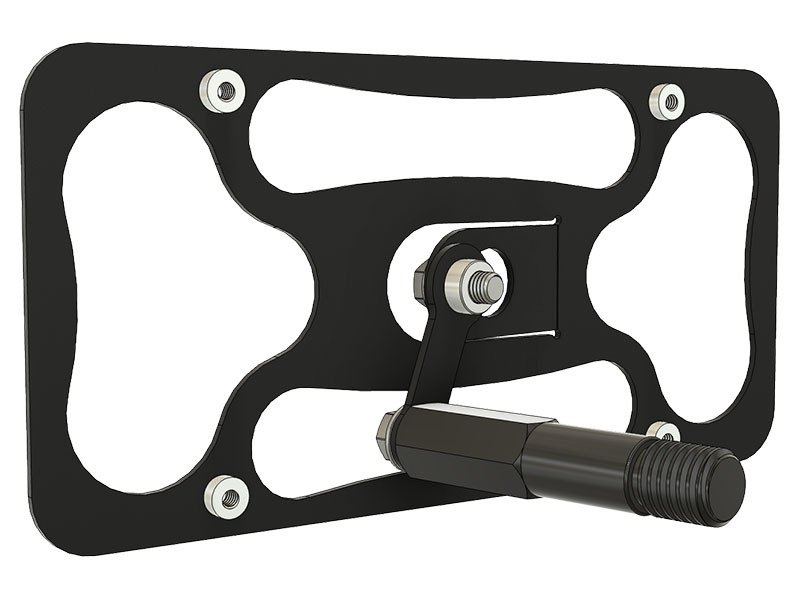
In general the Platypus consists of two main parts. the HEX stud which screws into the towing eye receptacle of your vehicle and the backplate which attaches to the hex stud and allows for secure attachment with full rear backing of the license plate. Hex studs come in a variety of thread sizes/types as well as different lengths. There are 4 styles of backplate which have different locations for the mounting tab. For each kit we have chosen the most appropriate backplate for a given vehicle.
The mounting tab is designed as an adjustment point to adjust the angle of the backplate in relation to the bumper. Out of the box it is set at an arbitrary neutral angle.

Each mount is tailor fit for its intended vehicle by selecting the appropriate thread size, hex stud length, and backplate.
Platypus Common Issues
The hex stud won't screw in
This is the first possible issue you may come across. Our track record for identifying threads is near perfect and manufacturers are typically very consistent with the thread type and size they use. They do throw us curveballs occasionally, but generally they are not changing thread type or size year to year in the same generation, and it’s rare to change from generation to generation. All this to say you can be pretty confident that you have received the correct hex stud.
The easiest way to verify if your hex stud has the correct thread is to compare the hex stud to the factory towing eye. The diameter and thread pitch, or the distance between the individual teeth, should obviously match. Thread shape may not be an exact match.
If for any reason you can’t obtain the factory towing eye, the next best method is to simply attempt to screw the stud in. First you’ll want to ensure you are rotating the stud in the correct direction as some vehicles use a left-hand thread on their towing eye. If the part number engraved on the stud has an R ( ex: HEX-K17R119) , it is a normal stud, righty tighty lefty loosey. If the part number has an L ( ex: HEX-B19L086 or HEX-B19L086-LH) then it is a left-hand thread, turn LEFT to tighten and right to loosen.
If the stud starts, but quickly feels too tight, this is common. Due to variation and the anodized finish on the studs they can be tight. Using the proper socket and wrench you will find that if you keep going the stud will free up and can be screwed all the way in. Keep in mind, we are very confident with our thread sizing! If a stud starts going in a few turns and then gets very tight, it may be the wrong size. If the stud threads in but feels loose in any way or simply doesn’t engage, it is the wrong size.
There is an issue with the length of the HEX stud
We choose the length of our HEX studs to keep a minimal distance between the plate and the bumper where the plate attaches to the stud, roughly an inch or so:
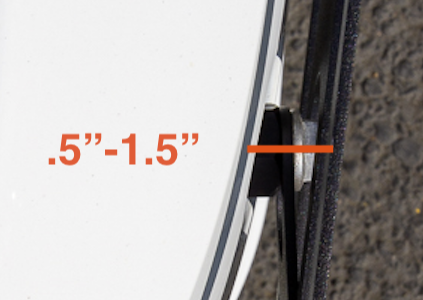
In some cases this causes the appearance that the HEX stud is too short since it doesn’t fully protrude from the bumper skin. Most often this is intentional, and users will find when securing the backplate that there is sufficient clearance. The best sign that a stud is indeed too short is if the mounting tab itself would be in contact with any part of the bumper skin once secured.
A false positive symptom of the hex stud being too short is covered in the next issue:
The back plate touches my bumper
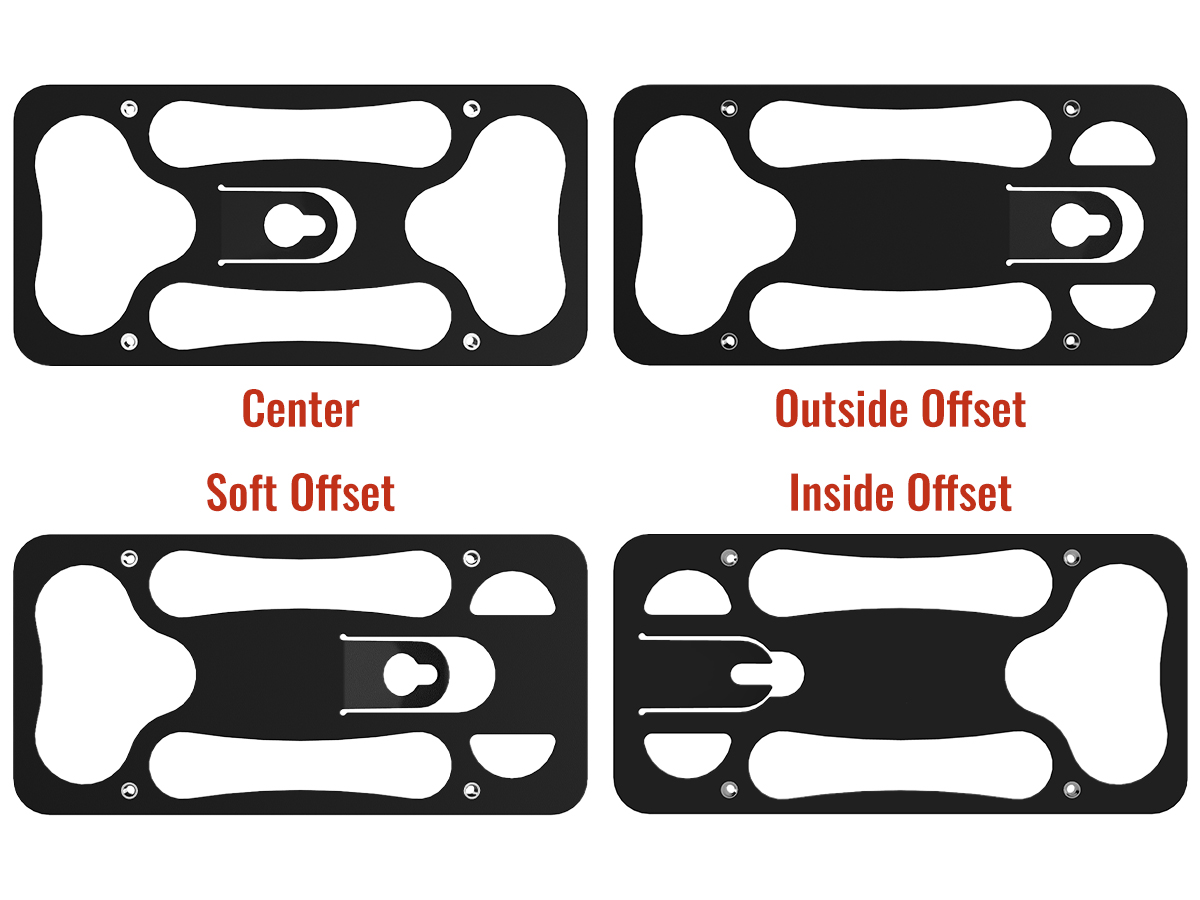
You may find that in its factory angle setting the back plate would be in contact with the bumper skin if installed. This doesn’t mean the stud is too short. More likely it just means that the angle of the mounting tab is outside of the acceptable range for that particular bumper. To resolve this issue, you can simply assemble the mount off of the vehicle and adjust the tab such that the backplate will sit at an angle suitable for your bumper.
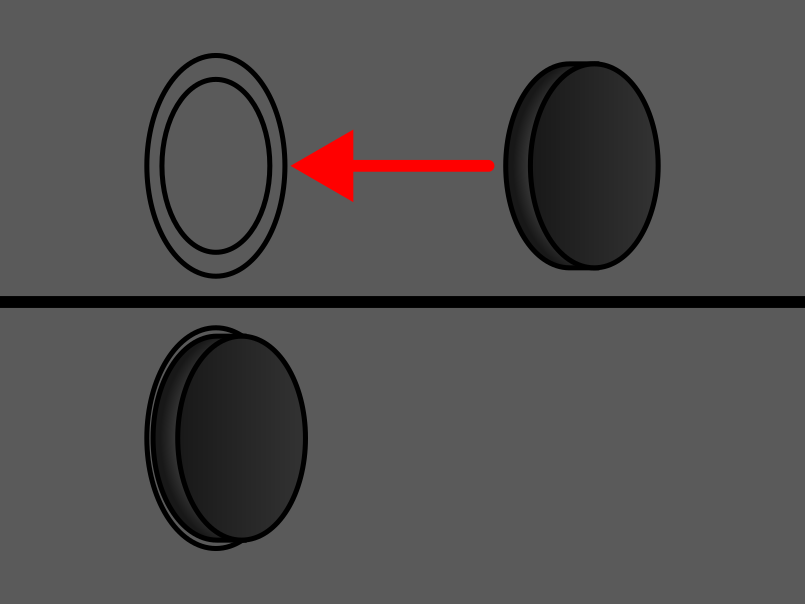
The Platypus Interferes with my parking sensors
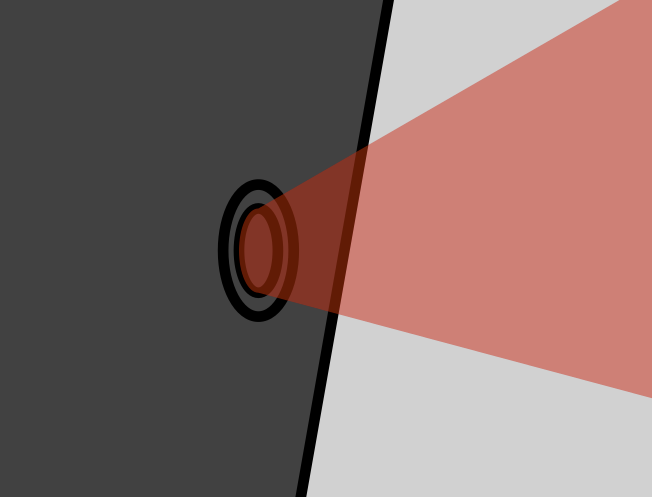
Most kits for cars with parking sensors require adjustment in order to avoid the sensor’s vision. Speaking of which, parking sensors have a conical field of view, meaning the closer you are to the sensor, the narrower its field of view:
When adjusting the goal is to keep the backplate closer to the bumper skin on the side that is closest to the sensor. You can find a detailed guide on adjusting the backplate for parking sensors here:
Sensor Adjustment GuideWhen interference with the parking sensors is unavoidable, our last resort is to use what we call “blinders” to effectively temporarily disable the affected sensor. If we have found blinders to be necessary for your vehicle, they will be included with your kit. To use the blinders simply stick the adhesive backed blinder directly to the sensor and test. In some cases more than one blinder is necessary.
We strive to provide the best possible kit we can for each vehicle. It is a constant process to navigate miniscule changes in vehicles year over year. If you are not satisfied with the fitment of your Platypus mount, we will always do everything thing we can to ensure the best possible fit, or offer a completely free return and refund. For further support you can email: support@cravenspeed.com