Please Note: The content from this page is taken directly from the installation guide at Revlimiter.net
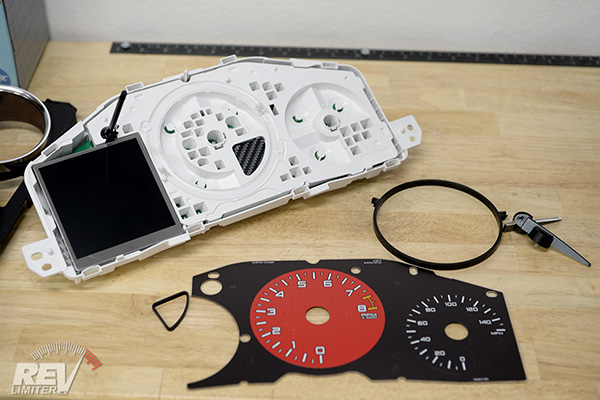
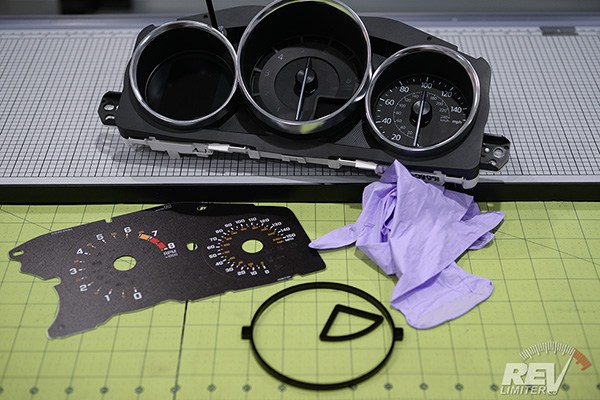
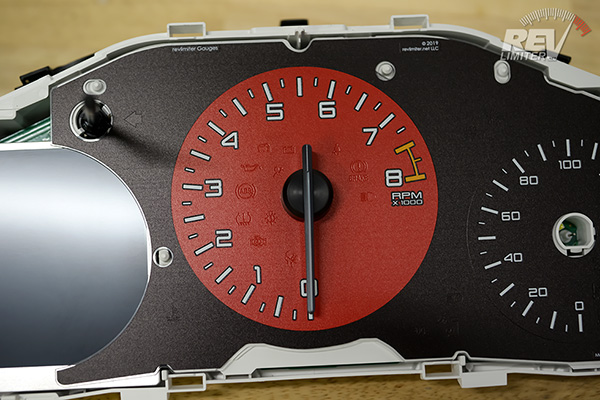
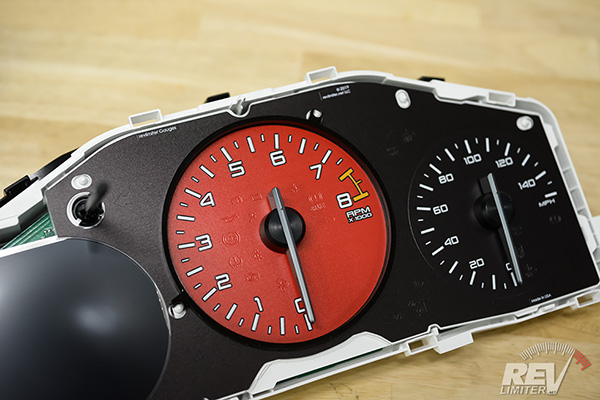
revlimiter Gauges waiting to be put in service.
Your Shopping List
- A set of genuine revlimiter Gauges. - You can buy them right here on this site! Check out the revlimiter.net Store. Other gauges may be of lesser quality or not compatible with the steps below. Don't settle for anything but the best!
- Powder-free gloves - These come with your gauges. Because you'll never be able to wipe off finger prints from most gauges, including your old stock ones.
- Dry dust cloth - This comes with your gauges. It's normal for gauges to become a bit dusty while you work on them. This cloth gets them looking good before sealing up your cluster.
- Paper towels - always helpful.
- Superglue - To put your needles back together.
- A 10mm socket and ratchet - To remove a piece of dash trim and undo the battery negative cable.
- A Phillips screwdriver - one P2 (#2). If you've got JIS drivers, they work even better.
Frequently Asked Questions
- I got a smudge on my gauge. Can I wipe it off with rubbing alcohol?
With Gen3 revlimiter Gauges - sorta. I'd not use rubbing alcohol, but a damp rag/microfiber/paper towel is fine. Gen3 gauges are waterproof and easy to clean up. You can also remove dust from them with blue painters tape. - Where can I get the gauges in these pix???
I sell them here on this site! Check out the revlimiter.net Store. - I want to change my ND lighting color. Can these gauges do it?
The short answer - no.
The longer answer - not in any good or useful way. Due to the always-on lighting of the ND, any tinted lighting color will show up during the daytime... poorly. It'll be dim and unpleasant in the daytime and poor looking at night due to the white digital gauge. I've spent months learning this. The best (and only) choice for ND lighting is white/clear. - How do I know the tach / speed/ etc is accurate after doing this?
The two ND gauges use stepper motors that self zero. When you apply power to the board, the gauge cluster recalibrates itself and makes note of where zero is. Because of this, it's very very easy to install a new gauge face and have no loss of gauge accuracy.
The only possible problem is accidentally removing the metal center pin that the gauge needle plugs into. Doing this will result in a stepper motor that's not working as it should. There's info on fixing that below. Often soldering in a new stepper motor (which is not hard) is the best solution. - Will this make my odometer read wrong?
No. The odometer is not affected by this job. Removing and reinstalling will not change it. But your trip odometer will be reset. Some folks use that to track their mileage (including me) and this fact is nice to know before you put the cluster back in only to see 0 on the trip meter. - This looks scary. Can you do the install?
Of course! I have an installation service available. Please click this link and read about the NC/ND installation. Spoiler: I do all of the stuff below. And if a stepper motor breaks during the install, I replace it. You get a fully working cluster back in your hands, ready to be reinstalled. - Some other shop sent me to this page. Is it cool if I use the info here?
Well, sure! The thing I enjoy most is helping out my fellow Miata enthusiast. However, I'd greatly appreciate it if you would drop me a note and tell me about these other manufacturers who are ripping off my hard work.
Gauge Cluster Removal
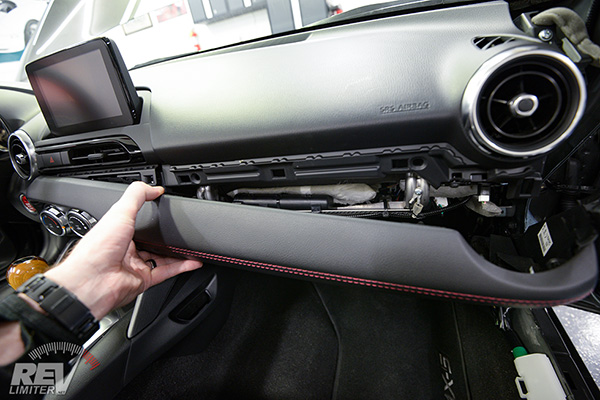
Get ready for a TON of work to finally get the interior in a place to remove that cluster. Though there are only two screws, there's a jillion plastic pieces covering a tab on the right hand side of the gauge hood. Because of that tab, you have to remove most of the dash, starting with the passenger side door sill.
PLEASE PRE-READ THESE INSTRUCTIONS! There's nothing tricky about this, it's just a lot of panels to remove.
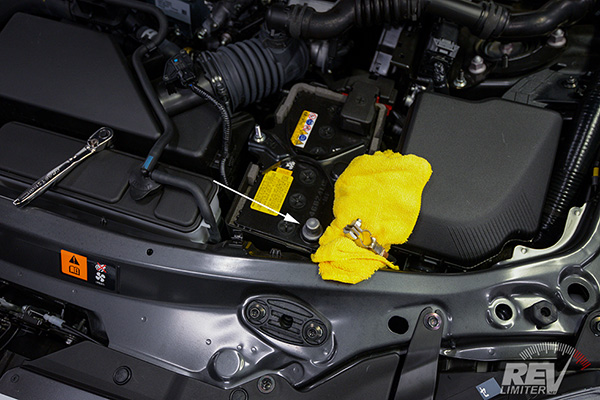
Step 1: Remove the negative cable from the battery. This is hugely important as you do not want the ECU to know that the gauge cluster has been removed and set a CEL for you to worry about later. It's also nice to not accidentally zap yourself, but that's nearly impossible. Much more likely is an unhappy CEL light starting at you when the ECU tried to display a message to the digital gauge and wasn't able to.
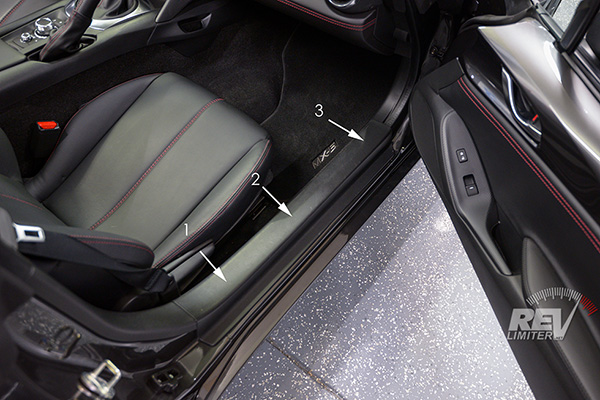

The first panel to remove is this passenger side door sill. Yes, the PASSENGER side. The one without the steering wheel.
Pull directly up at #1. You'll feel a little pop. There's 4 sets of grabbers that function together. Pop-pop-pop and the sill plate is off.
The kick plate comes off next. There's a plastic fastener way at the front. A flashlight helps you find it. Pull that out and then the panel comes free. Also remove the flexible trim with it and make note of what side is up.

The A-pillar trim has to be removed next. The factory service manual pix are most helpful here. Pull directly out and then up as shown in the manual.

This VERY poor photo shows how the A-pillar trim comes out - top edge first. Then you can lift it up and begin unhooking the tweeter.
The tweeter can be unplugged instead of removed and allowed to dangle, but it's nearly impossible. I've unplugged it once and nearly broke the connector. It's much easier to just pry the whole tweeter upwards a bit and unsnap it from the A-pillar holder.
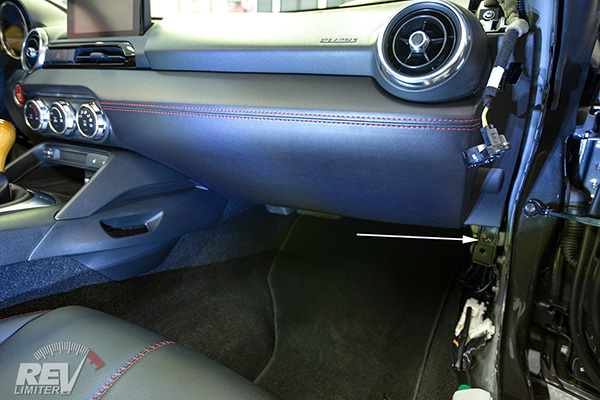
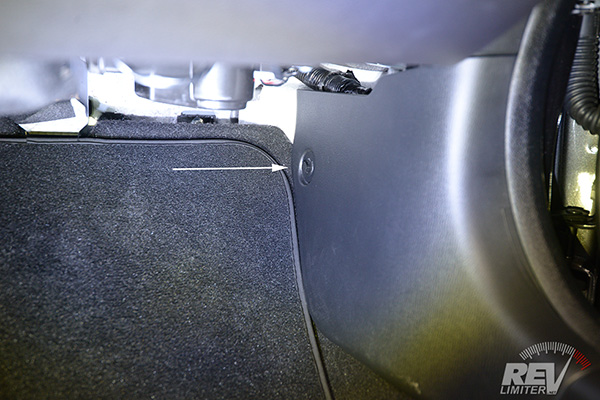
All of those things above were done so that this large under-dash panel could come out. Undo the ONE bolt shown with the arrow using your 10mm wrench. It's the only bolt on here.
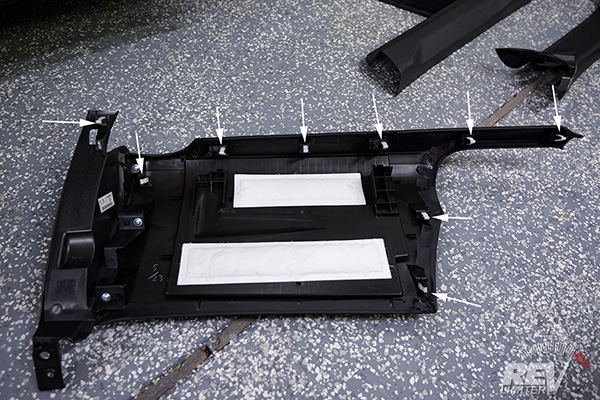
The panel pulls free easily. It will get stuck on the left hand side. Be careful but just pull it straight towards your chest. It should come free without any problem.
The photo showing the back side is to illustrate the various clips present on the panel and where you might need to pull to get it to come free.
Before you forget, you might do this to your dash pad. A small square of blue tape on the other side lets you know where to press in order top securely reinstall it and not have any rattles. When reinstalling, just press on the tape until you feel each clip pop into place.
This is the final panel to remove before you can pull off the gauge cluster cover. This little hazard panel also pulls straight out. It's easiest to start pulling on the edge shown. The right side likes to act as a hinge.
The hazard has a small electrical connection on it. It unplugs easily. Note the location of the tab.
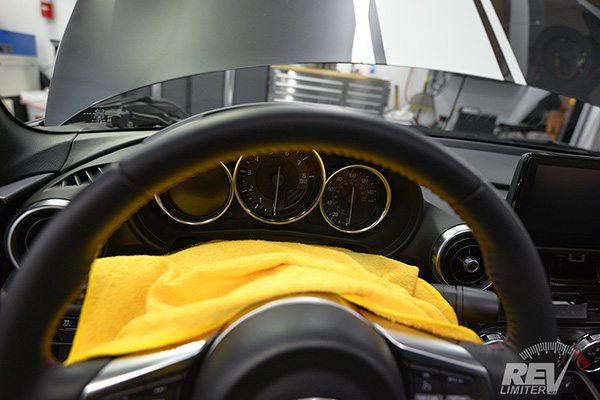
Lay something soft on the steering column cover to prevent scratches. It is VERY soft plastic and scratches easily. I like the yellow Costco microfiber towels since they're so cheap as to nearly be disposable.
Tilt the steering column as far down as possible and pull it as close to your chest as possible. This gives the most room to work.
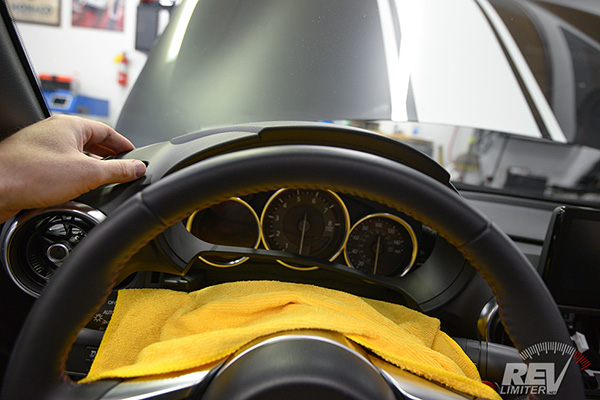
FINALLY the steering column can be removed!!! Pull with even pressure on either side. It will pop free with no drama. ND2 folks get to worry about an electrical connection on the right hand side.
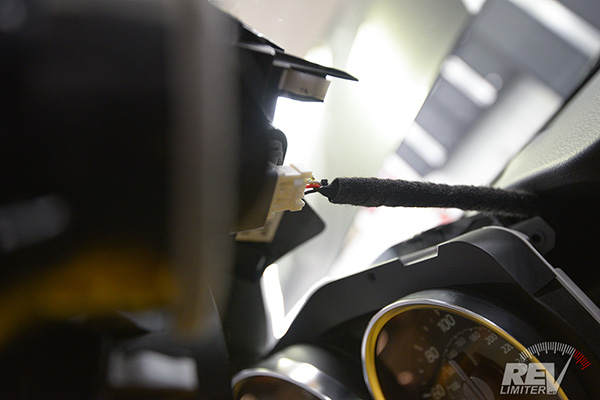
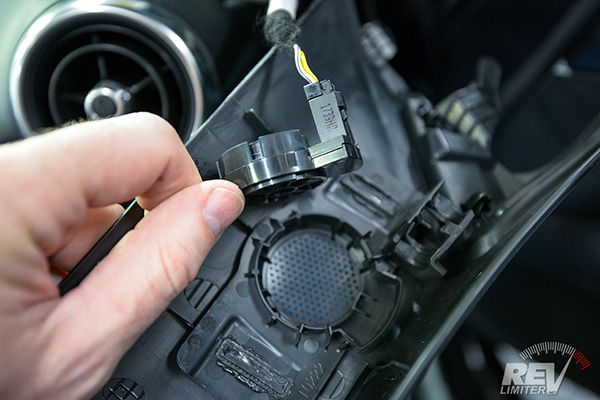
This little temperature sensor is a pain to unplug. Fortunately, they designed it to that you can actually get a finger on the tab and disconnect it. The tab faces the floor.
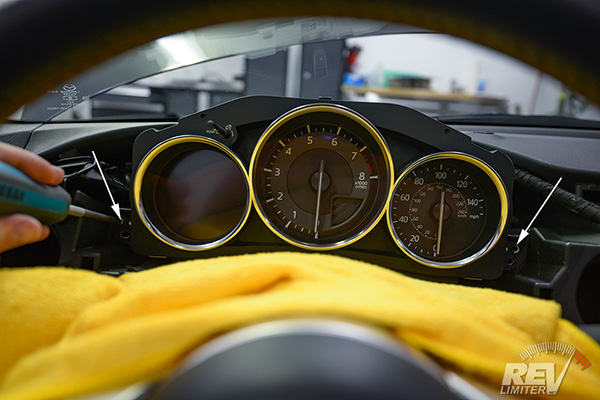
Two screws hold the gauge cluster in place. Unscrew them and set them aside. Don't forget them when you reinstall the cluster.
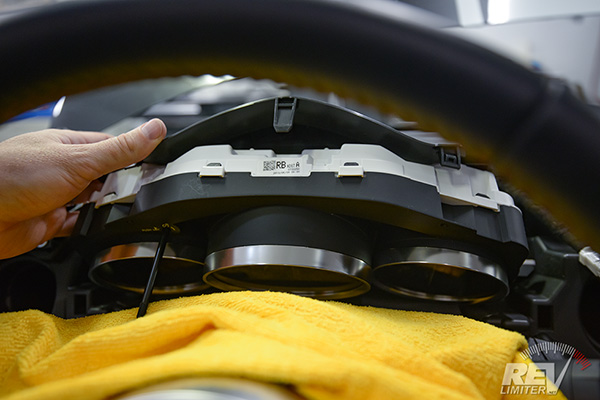
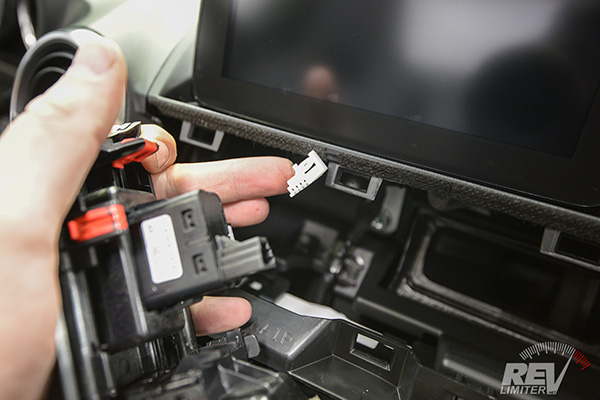
Just like every other part, the cluster also unsnaps from the dash. Pull it forward and tilt it down to get access to the single wiring harness.
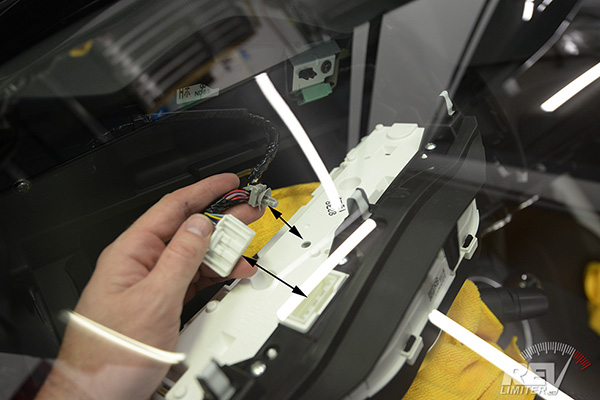
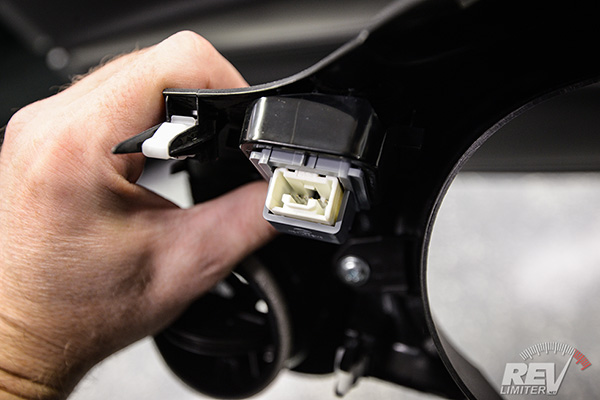
The wiring harness unplugs easily. There's a tab on the top (my thumb is resting on it in this photo). The whole thing is supported by a plastic pin that also pulls out easily. Give it a firm yank and that pin will pop free from the gauge cluster.
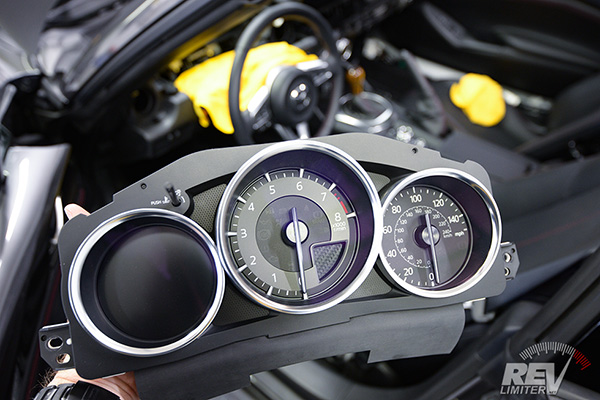
FINALLY!!! The cluster is free! Take it to your work area and get ready to swap the gauge faces out.
A Shortcut for the future

If you think you'll ever want to remove the gauge cluster again, please do yourself a favor and check out the shortcut on my blog.
After about a few minutes of careful sanding with a dremel, you can remove the tab on the gauge cluster cover that makes ALL of the above necessary. I can do a full gauge swap on my own ND in about five minutes. Check it out. It's reversible (if you buy a second gauge hood someday) and doesn't create any new rattles.
Gauge Face Removal
Take the cluster out of the car and to a comfortable, dust-free work area. Put your gloves on now. Your Gen3 gauges can have grease wiped off of them, but it takes a really long time. It's far easier to wear the gloves for your whole install.
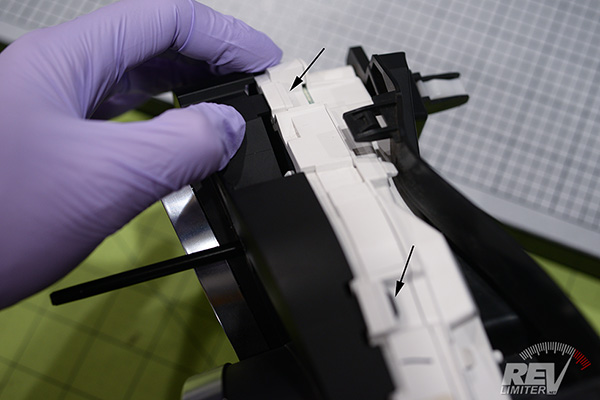
The cluster has a few plastic tabs all around the outside keeping the front cover in place. You can pop one free with your thumb very easyly and pry forward a bit. Then, while keeping pressure on the front cover, pop the next one free. Work your way around the cluster until...
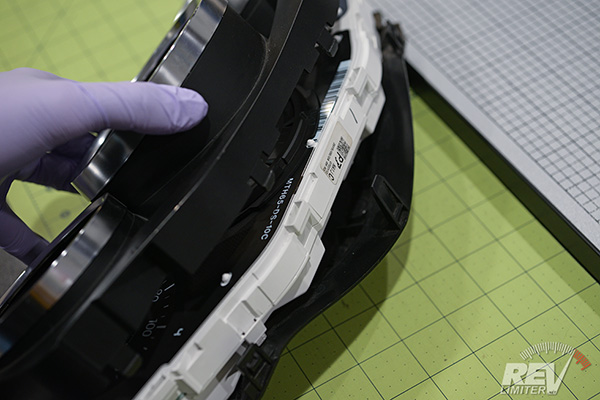
... you can get the whole cover off! If your odometer stick falls out at the same time, don't worry. Just note the internal D-shaped recess and place it back on the metal shaft.
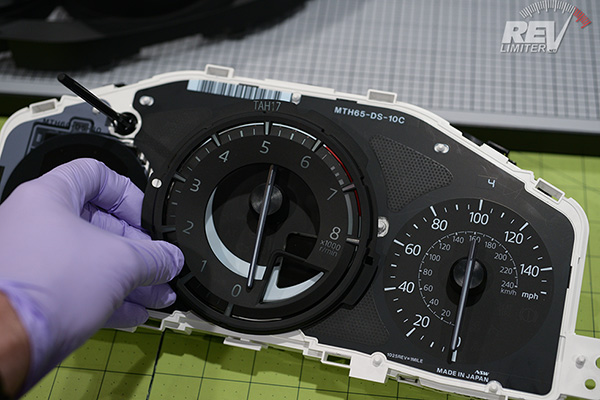
The plastic tach face just sits on top of the gauge sheet. You can easily remove it now. It might have fallen out when you took the cluster cover off.
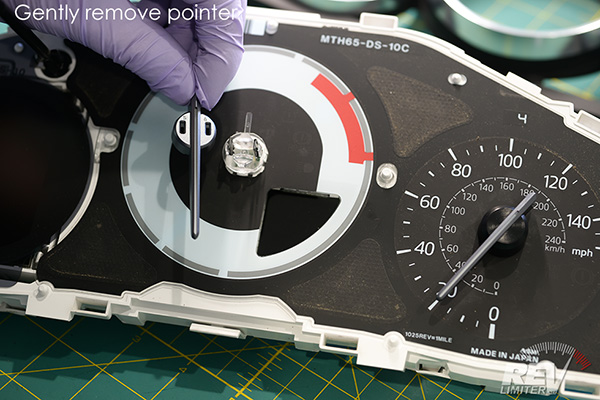
Gauge Needle Removal
THIS is the hard part of the whole install. Give yourself plenty of time to get these needles off. Patience is required. The more gently you can remove these needles, the higher the chances you'll have of not needing to repair or replace a stepper motor later.
There are TWO (2) ways to remove the ND gauge needles. ND1 clusters with the black/white digital gauge can usually have their needles removed by twisting them off. The RF and ND2 clusters with the full color digital gauge seem more delicate. They need to have the needles disassembled in order to best remove them without pulling the metal shaft out.
Please note, the disassembly method takes a bit more work but it's much safer. It's nearly impossible to damage a stepper motor this way. I recommend this over twisting the needle off.
Please read the section below with the photos and text, but sometimes a video really helps. Check out the above video to see how to disassemble the ND gauge needles.
Needle Disassembly Method:
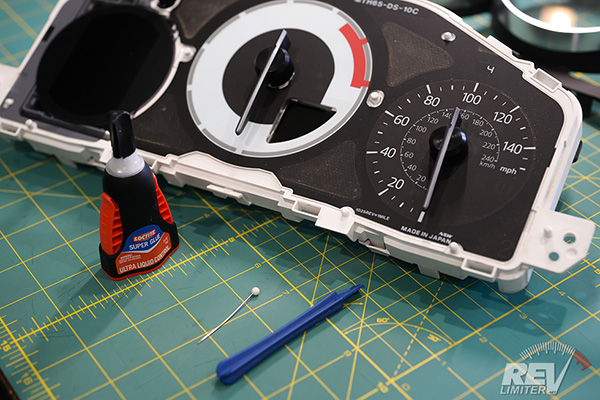
You'll use the included single pry tool and sewing needle for this. You'll need to source some superglue to put the needle side caps back on. I really like the "liquid ultra control" stuff pictured.
The needle is made up of four parts - two side covers, the pointer, and a clear light pipe. We're trying to remove the three parts to get access to the light pipe.
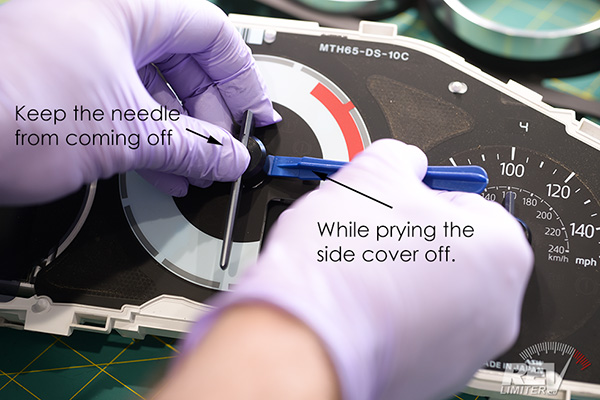
Support the needle with one hand while you pry the plastic side cover off with the other. The little pry tool is a bit easier to use than just prying with your fingers. A good bit of force is needed to snap this off.
Repeat on the other side. Set these aside to be glued back on later.
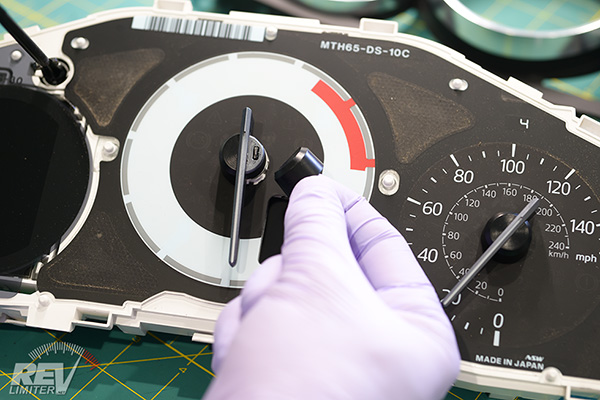
The pointer isn't secured by much with those side caps removed. It can be easily separated from the light pipe.
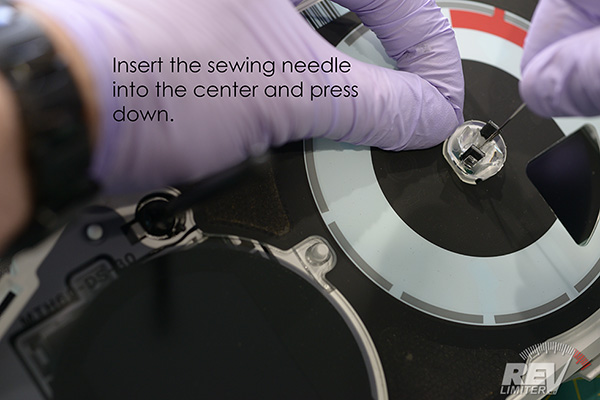
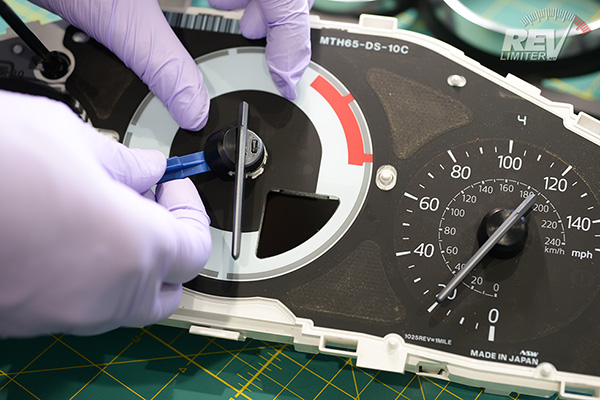
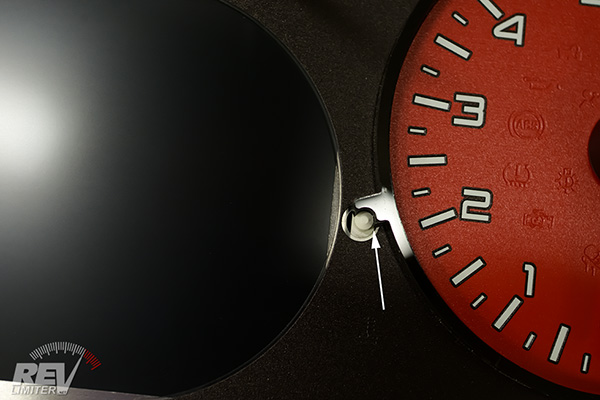
The light pipe is the part that spins on the metal shaft. It has a very small hole in the center that you can poke something into. I've included a sewing needle for this task. The purpose of that sewing needle is to apply force directly on the metal shaft and keep it from coming out with the light piping.
Grab hold of the light pipe and twist it counter clockwise while pulling up. Make sure to always be forcing the sewing needle down to keep force on the inner metal center of the stepper motor.
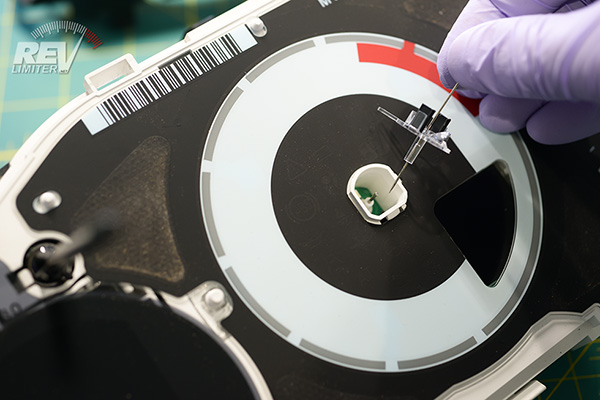
Boom! Removed! Now repeat on the speedometer needle, which is the super-delicate one on the ND RF and ND2.
To reassemble, just stick the light pipe back into the pointer body. Note that the tail goes on the back section of the pointer. Then use the superglue to attach the needle side caps.
You will never need to do this again to remove the needle. Install the needles lightly when you put the new gauges on.

Twist off Method. Note that this is an alternative to the above disassembly method. You only need to do one or the other. I suggest doing the disassembly.
To separate the needle from the stepper motor, the best way is to very gently force it toward and past the low-end stop. You want to grab the needle by the center - NOT by the needle itself - and gently pressure it past that zero point to separate the metal shaft from the needle. Once you get a bit of movement in that direction and you feel the needle nudge free, start applying gentle pressure upwards while still twisting it past that zero point.
Did I say "gentle" enough? Force will cause the metal shaft to come out with the needle itself. Realize that you can spin that needle the wrong way an unlimited number of times. Nothing bad will happen to it. The more you spin it while gently pulling up, the better your chances of getting the needle off without pulling the stepper motor metal shaft out.

Repeat the needle removal process with the tach needle. Spin it the wrong direction while adding a bit of force to pull the needle out.

Remove the gauge sheet and set it aside. The hard work is done.
Videos are sometimes helpful, so here's one dealing with removing the ND needles by spinning them off. And at the end, I show how to re-calibrate the needles.
Gauge Face Install

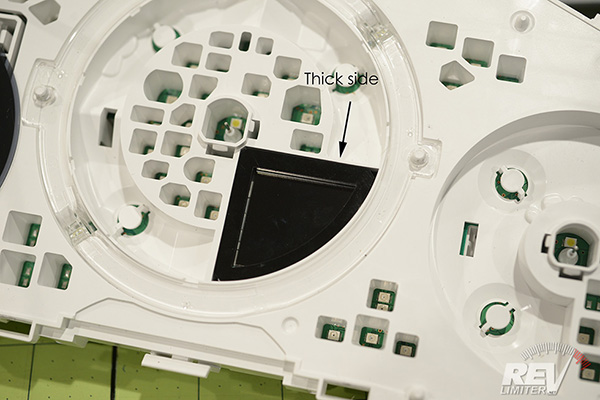
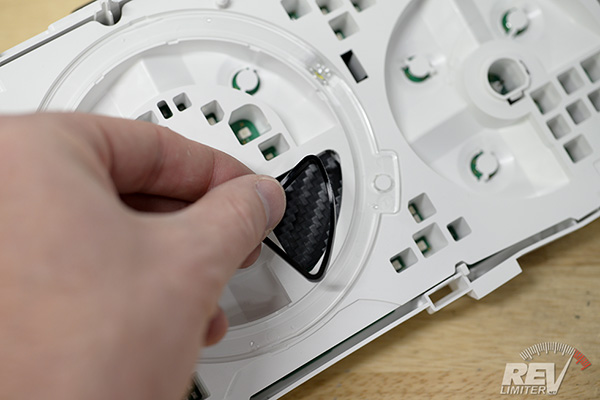
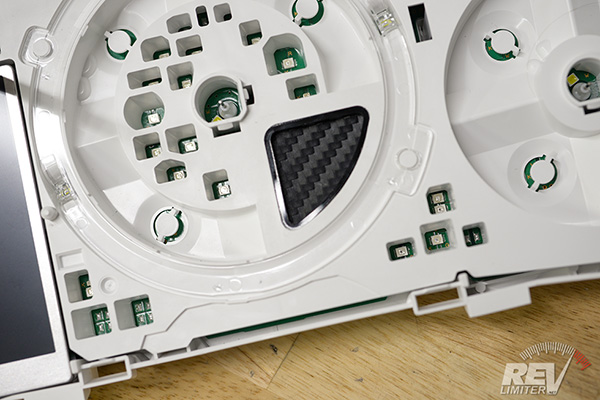
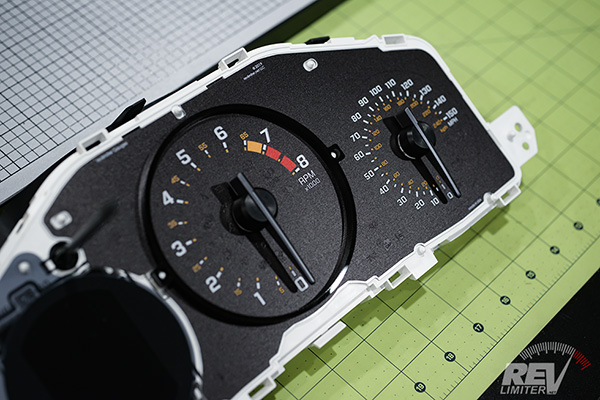
These little triangles go under the gauge face sheet to block out light that might leak around the shift indicator. Pictured above is the ND1 cluster with the simple digital gauge. Note that it has a lot of open area. The thicker arm of that triangle goes on top.
If you have a gauge set that deletes the shift indicator, you don't need to install this triangle.
This is the triangle for the ND2 (full color digital gauge) cluster. Note that it's WAY smaller than the ND1. It has no directionality. It's also a tight fit, so don't be afraid of shoving it in place.
Again, If you have a gauge set that deletes the shift indicator, you don't need to install this triangle.
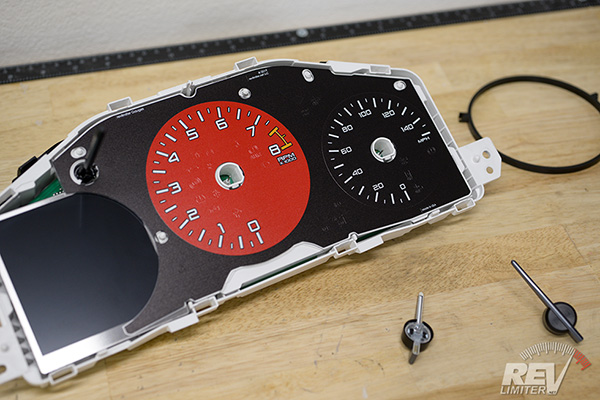
Now install the face over top of the cluster. It just lays on top.
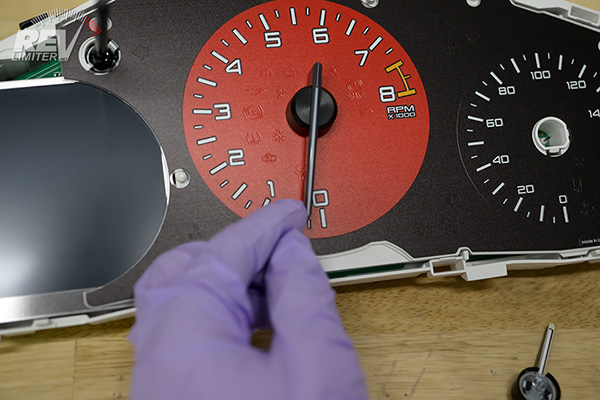
Next is installing and calibrating the tach needle. Pop it onto the cluster gently. Make sure that the zero point for the stepper motor is somewhere around 1000-2000. Something greater than zero. Then gently push the needle backwards against the stepper motor just like you did to remove it, only this time you're trying to line it up with the zero point. Once you get it zeroed to your satisfaction, press the needle on a bit harder. You're done! Onto the speedometer needle.
The speedometer zeroes exactly the same as the tach - right at the zero point. Repeat what you just did on the tach until you have the needle pointing at the zero for the speedometer. If you go past, just spin it all the way around and try again. Once you're happy, press the needle onto the base a bit more firmly.
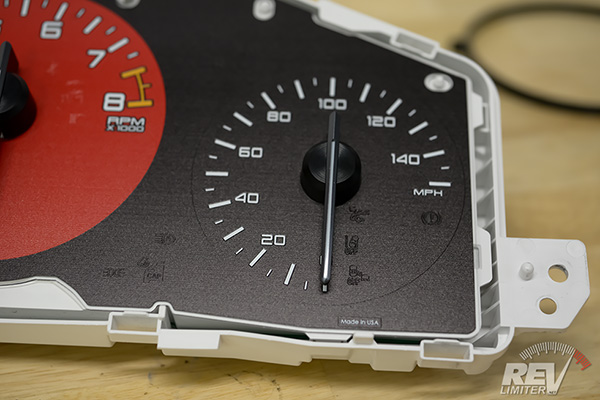
Install the spacer ring around the tach face. This takes up space left from not using the OEM plastic gauge face. The ND1 version is shown above - note how it has supports at 3 and 9 o'clock.
This is the ND2 spacer ring. It has supports at about 1 and 8 o'clock. Note that the 8 o'clock support isn't symmetrical and has half of its body missing. This is by design. The ND2 cover doesn't have space for it to have support on both sides. Don't install this spacer ring backwards.
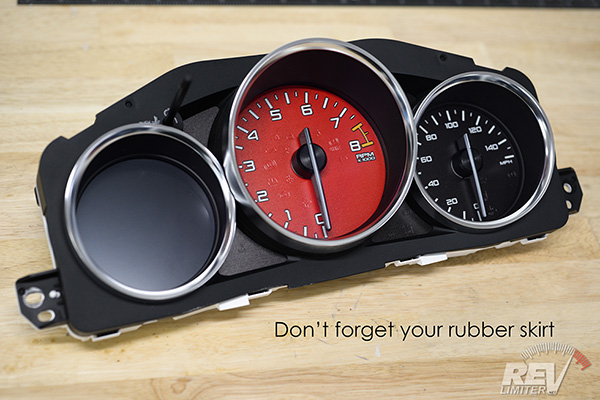
And that's it! Install the cluster cover, clean the glass, INSTALL THE RUBBER SKIRT, and reinstall the gauges in your car!