THANK YOU for purchasing the Hot Link - Coolant Temp Adapter - Gen 1 from CravenSpeed. This product is made from the highest grade materials, and is guaranteed to be free from defects.
You can buy our CravenSpeed Water Temp Sender Adapter for MINI Gen 1 here
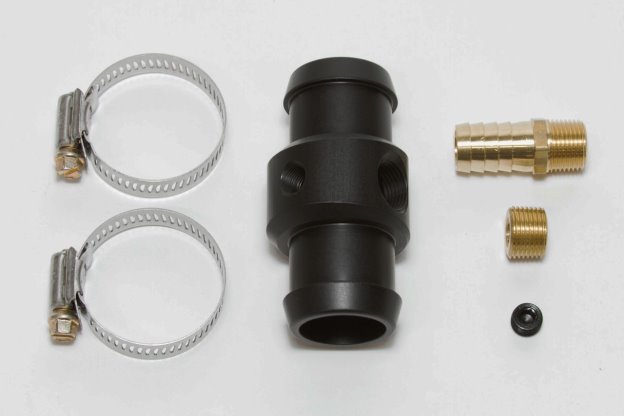
Parts Included:
- 1x Hot Link
- 1x ⅛ Pipe Plug
- 1x ⅜ Brass Plug
- 1x ⅝ Brass Hose Fitting (Not Used with MINI Gen 1 Vehicles)
- 2 ea Hose Clamps
- Thread Sealant/Teflon Tape (not included)
- Coolant (not included)
- Temperature sensor or any related gauge components (not included)
Tools Required:
- 5/16 Socket Wrench or Standard Screwdriver
- 8mm Socket
- 3/16 Hex Driver
- 5/16 Hex Driver
- Adjustable Pliers
- Drain Pan
- Coolant hose pinch pliers (recommended)
***EXTREMELY IMPORTANT*** THE ENGINE MUST BE COOL PRIOR TO INSTALLATION OF THIS PRODUCT.
Procedure
- Park your MINI in a level, well-lit area and pop your hood. It’s a good habit to disconnect the negative (-) battery terminal anytime you’re working around your MINI, so grab your trusty 10mm socket and do this now.
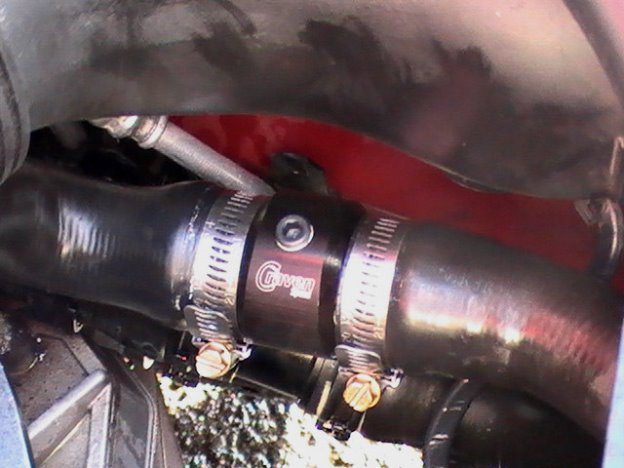
- Just behind the radiator core support you’ll find the upper radiator hose and a plastic coupler/bleeder fitting. The Hot Link replaces this fitting.
- Place drain pan under this area on the floor.
- The radiator hose is held onto the intercooler via a hose bracket with an 8mm screw. Remove this screw so that you have more slack in the hose to work with while installing the Hot Link.
- Prepare the Hot Link by applying some thread sealant/teflon tape onto the ⅜ Brass Plug and installing it into the larger of the two threaded ports with your 5/16 Hex Driver. Next, apply some thread sealant/teflon tape to the threads of your gauge temp sender (included with your gauge kit) and install it into the smaller of the two threaded ports.
- Remove the stock hose clamps from either side of the stock coupling by pinching them with your pliers. If you have them, utilize some hose clamps to minimize coolant spillage. Pull the coolant hoses off both sides of the stock coupling. WARNING: FLUID WILL LEAK
- With the factory hose coupler removed, slip the included hose clamps loosely over the coolant hoses and then install the CravenSpeed Hot Link, pushing the hoses all the way up against the center section of the Hot Link housing. Slip the hose clamps into position and tighten.
- Reconnect your coolant hose bracket and perform the necessary wiring as outlined in your gauge instructions.
- If you’ve lost very much coolant over the course of this install, top it back off with what’s recommended by the factory. Reconnect your battery (-) terminal and tidy up your work area.
NOTE: Please be sure to clean up any spilled coolant that may be left on the ground as it is extremely harmful to our furry friends.
If you have any questions about this installation, please give us a call at (503) 505-6886 Monday thru Friday between 8:00am and 4:30pm Pacific Time and we will be glad to give you a hand.
We love pictures too! If you have some nice photos of our products that you would like to share with us, you can email them to: support@cravenspeed.com